SHARPENING - Testing the Sharpness of your Blade
By
Mark Hordon
Over the years I probably heard more baloney about what constitutes a sharp cutting edge, and how you should test the sharpness of one, than can be found in a political speech! I’d like to take some time out and share my knowledge with you about the best, and worst, ways to test a blade for sharpness. I’ve seen, and heard, just about every imaginable test that has, or could ever be conceived, or invented, to test the sharpness a cutting tool, here are a few of the more notable.
The Tongue Test
Probably the most dubious sharpening test out there, yet surprisingly mesmerising to watch, is the ‘Tongue Test’. When demonstrating my sharpening techniques to the public, at the many shows that I attend each year, I am now always put on my guard when I hear the immortal words “Hey, I’ve got a great way of testing the sharpness of my knife!” Let me explain.
The ‘Tongue Test’, comprises of placing the cutting edge, of a favourite blade, onto the epidermis layer of the tip of the tongue and then sliding either the tongue, or the blade, back and forth so that tongue gets a good feel of the cutting edge’s quality and sharpness – I’m guessing here that because the tongue is a very sensitive organ, it can feel for the quality of a blade's cutting edge.
Since this technique could be considered to have a certain degree of merit … if … and by if, I mean … IF … you are not used to your blades being all that sharp, I’ll include it in this article. To me, and any sensible reader I would hope, the Tongue Test establishes what you should NOT do when trying to ascertain your blade’s sharpness, this is because one day your blade just might be! With this in mind, let me tell you a story!
Once upon a time I had just finished sharpening a client’s knife, a knife belonging to a ‘Mr. Doe’ – I am keeping his identity hidden to save him embarrassment, but you know who you are Mr Doe!!! As I began to hand Mr Doe’s blade back to him, his enthusiasm to receive it, effectively caused him to snatch it from my hand. Immediately it was in his possession I heard the infamous and now immortal, yet mesmerizingly naïve, words, which will forever be indelibly printed on my mind, issued from his excited lips. “Hey, I’ve got a great way of testing the sharpness of my knife! Shall I show you?”
Now, I can honestly say that I have only ever seen the ‘Tongue Test’ technique performed once in my life and this was that occasion. The sudden disappearance of the knife from my hand, the invitation to see what was, to me, new sharpening test technique and the overwhelming desire not to appear impolite, sort of took the wind out of my sails for a second or two, which was one or two seconds longer that it took Mr Doe to actually perform his little demonstration.
You must trust me when I say that there is nothing quite like seeing bright red blood oozing from the newly created cut on the tip of a damp, white fur coated, tongue to stop you in your tracks and contemplate what you are witnessing … if only I’d had a my phone ready, videoed it and uploaded it to YouTube, it would have gone viral and Mr Doe would now be a very famous man!!!
His bright red blood, lazily, meandered along the saliva trails on his white tongue, which almost immediately began to form a transparent radiating circle! It was like looking at an egg being cracked into a hot frying pan, then watching as it slowly spreads across the surface turning white (or red as in this case) as it the cooks. Certainly the marked contrast of red on white is amazing to watch.
I watched, with awe and a degree of fascination, the slow motion realisation express itself on Mr Doe’s face, as the pain receptors on his tongue frantically relay the message to his brain that something was not as it should be. When the messages obviously reached home-base, Mr Doe’s lips clamped around his tongue and it was then dramatically withdrawn from public view. The sudden dematerialisation of his tongue must have startled me because it took a reflex blink and there was a slight recoil of my shoulders as my internal danger signals went full claxon. This reaction was undoubtedly due to shock, or empathy (?), I was inadvertently feeling at the time; to be honest, I’m not entirely sure which, since I began to frantically consider whether I had become a victim of Mr Doe’s cruel joke!
If truth be told, I didn’t have a snowballs chance in hell of stopping Mr Doe from performing his little rendition of ‘That was a bad mistake!’, and am now pretty glad that I couldn’t. This is because, over the years, I have relayed this little anecdote to the many people, who have collectively taken a great deal of amusement from it, certainly it carries a message about inalienable rights of humans to be moronically stupidity as a species, as well as the irrepressible law of Cause and Effect!!!!
Either way you look at it, I’m proud to say that my response was up to its usual sardonic standards when I immediately said to him, “Well, I guess you would consider that to be sharp then?”
I have to conclude my little story by assuring all you good folks out there that I am now forever vigilant, waiting, endlessly waiting for someone to attempt a repeat performance; and pray that when it happens I’ll have my mobile ready and waiting to film it ... does this, I wonder, make me a bad person???
Needless to say, but I’ll say it anyway; the ‘Tongue Test’ is not amongst those that I would ever recommend anyone ever try, but I wonder how many of you are thinking of giving it a go!!!! LOL
The Good Old Thumb Test.
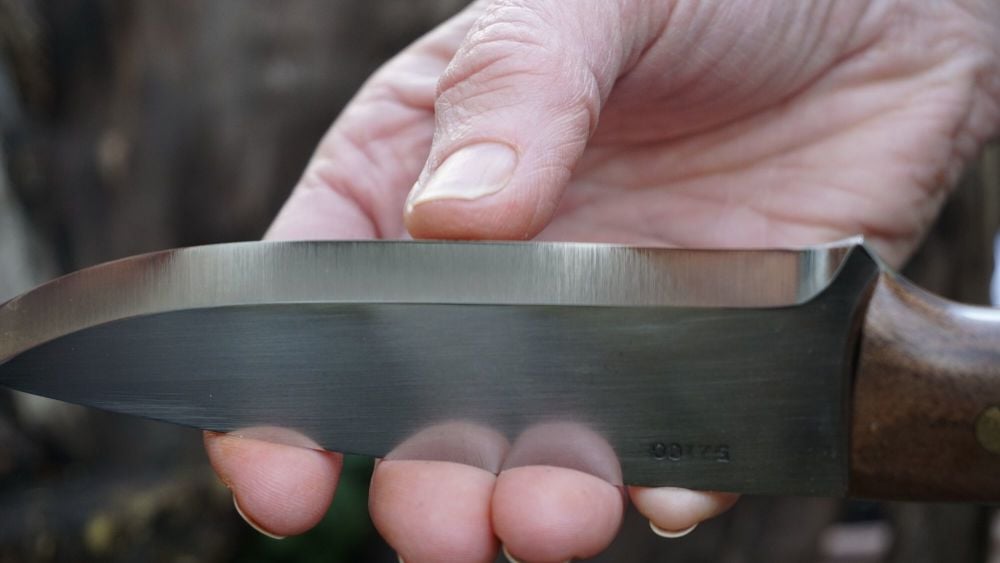 The test that I most common see, is the good old ‘Thumb Test’, a technique that consists of scrape the thumb, in a perpendicular direction, across a blade’s cutting edge with the fingers usually placed on the spine of the blade. I have found that this technique inevitably requires the practitioner make the serious statement “Yep! That sure is Dull/Sharp [delete as appropriate]!” followed by a confident nod, or shake, of the head whilst pouting the lips!
It has to be said that the Thumb Test is not really and effective way of testing the sharpness of a blade, nor is it the most reliable method either. At best the it unwittingly tells us the practitioner’s level of experience, or lack of it, by what he, or she, might correctly, or mistakenly, consider being sharp. At worst, it demonstrates just how poor the opinions and judgement calls of most people actually is, who would probably state that any angled piece of metal with a burr on it, or flimsy wire cutting edge, was in fact sharp.
So How Do We Test a Cutting Edge For Sharpness?
There are a number of well-established techniques out there that can be reliably employed to test for the sharpness, or lack of it, of a blade’s cutting edge, or, in fact the cutting edge of most any tool. Some of these tests involve the use of a fruit, some involve skin and hair, and others involve plastics, horn, paper and nails!!! All of them offer a high degree of accuracy without being overly pedantic and scientifically obscure. All of them are commonly available and for the most part ready to hand.
So let’s go through some of the more popular: -
The Hair Shaving Test
This is probably the simplest Sharpness Test to perform, since all that is required is your forearm, or the back of your hand, some hair on the same and a blade.
The blade is used to shave the hairs off the forearm or hand … and, well that is it! If it can do so then the blade is considered sharp, if it cannot it is considered dull. That’s all folks!!!
The down side of this test is that there a high risk of actually cutting yourself if you are sober and a guaranteed cut if you are not! It is, therefore, advised not to perform this test whilst under the influence, unless you enjoy the colour of your own blood!
The Paper Test
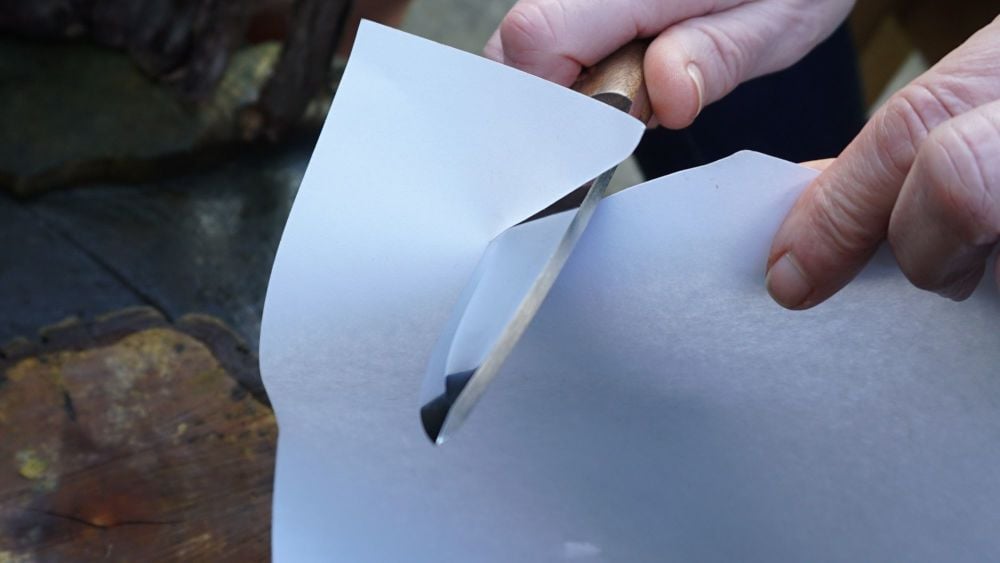 The Paper Test involves attempting to slice through a sheet of paper with a newly sharpened knife. If the blade cuts the paper without tearing it, then the blade is considered to be sharp, if, by contrast, the sheet of paper tears then it’s back to the old sharpening stones.
There is, however, much more to this test than simply slicing through a sheet of paper and hoping for the best. A great deal can be ascertained about the condition of the blade and its cutting edge by how easily, or not, the paper is cut. The following points should be remembered and then brought to mind whilst performing this test: -
- Can you only cut the paper when employing a slicing action? Or can the paper be cut by simply pushing the blade through it like pushing a chisel through wood? Obviously a push cut indicates a much sharper blade than does the slicing cut.
- What pitch can you hear when the paper is being cut? The higher the pitch the sharper the blade.
- Does paper’s edge have any feathering after being cut? If it does then this is an indication that the blade’s cutting edge may have micro nicks & chips on it that are catching on the paper’s fibres and tearing them rather than cutting them.
- Does the blade initially cut the paper and then simply end up tearing it? If this happens it could be an indication that the blade’s Relief angle (i.e. the ‘V’ of the cutting edge from either the spine or the sides of the blade) is far too obtuse. A Relief angle that is too steep will cause the blade, effectively, to become a wedge that will tear the paper, due to its thickness, before the actual cutting edge can reach the paper/cutting edge interface, and also if the blade is to reach its full cutting potential. If this is the case it would suggest that the Relief angle needs to be thinned down somewhat, unless the blade is being used for heavy duty chopping or some such task.
The ultimate drawback of the Paper Test will largely depend on a number of factors. For instance: -
- How thick is the paper?
- How damp is the paper?
- What additives are in the paper?
1. How thick is the paper?
The fibrous structure of the paper, paper being for the most part made from wood pulp, which is relatively tough, will have a certain resistance to being cut or sliced. When a blade is being used to cut a piece of paper there are three outcomes may be observed: -
- If the blade is not sharp enough to overcome the structure of the paper, the paper will buckle, bend or tear.
- If the blade is sharp enough to overcome the structure of the paper, the paper will be cut.
- If the paper is structurally sounder than the blade then the blade will bend, buckle or break. Admittedly this scenario is highly unlikely, but can happen.
The thickness of the paper is, therefore, an important factor in how well the Paper Test works. Obviously the thicker the paper the better it will withstand buckling and by the same token the sharper the blade is the more easily it will cut the paper. By contrast the duller blade the more it is likely to buckle or tear the paper, and of course the thinner the paper, such as in crepe paper, the sharper the blade will need to be cut through its unsupported fibres.
2. How damp is the paper?
It is important to consider how damp the paper is before attempting the Paper Test. Since paper is somewhat Hygroscopic its ability to stand up to the Paper Test technique will be influenced by the moisture content of the air at the time of the test. In principle, therefore, the greater the moisture content of the paper the less stability and structure the paper will have. It follows, therefore, that the damper the paper the more likely it is to buckle and tear rather than be cut even by a very sharp, or razor sharp knife.
3. What additives are in the paper?
Some whiteners used in paper production, such as powdered Talc, China clay or Titanium Oxide for example are quite abrasive. These minerals, being somewhat abrasive, will naturally reduce the sharpness of any cutting edge by virtue of the action of the blade cutting through the paper whilst the Paper Test is being performed. This creates a bit of a dilemma for the owner of the blade because in actuality, by performing the test we are actually dulling the blade.
Choosing the right kind of paper for the Paper Test requires, therefore, at least a modicum of consideration if it is to be performed successfully and consistently. Nuff said about paper then.
The Tomato Test
To perform the Tomato Test, it is naturally required that a good old fashioned tomato be ready to hand … I just happen to have one in my pocket!!! It is also commonly considered that the tomato should be in an overripe state if you are to get the maximum out of this test, since an overripe tomato has a relatively tough skin and no real cellular structure to support it.
The test is really quite simple, with only two outcomes to consider.
- If the knife is dull it will simply crush the tomato without cutting the skin.
- If the knife cuts the tomato skin without crushing it, it can be considered to be sharp.
The Tomato Test is a fair enough test … IF … you happen to have an overripe tomato on you at the time you are requiring to make the test … if you don’t, then the test is somewhat moot!
Other fruit and vegetables can of course be substituted for the good old tomato if required!
The Blade Wand Test – It’s Magic!!!
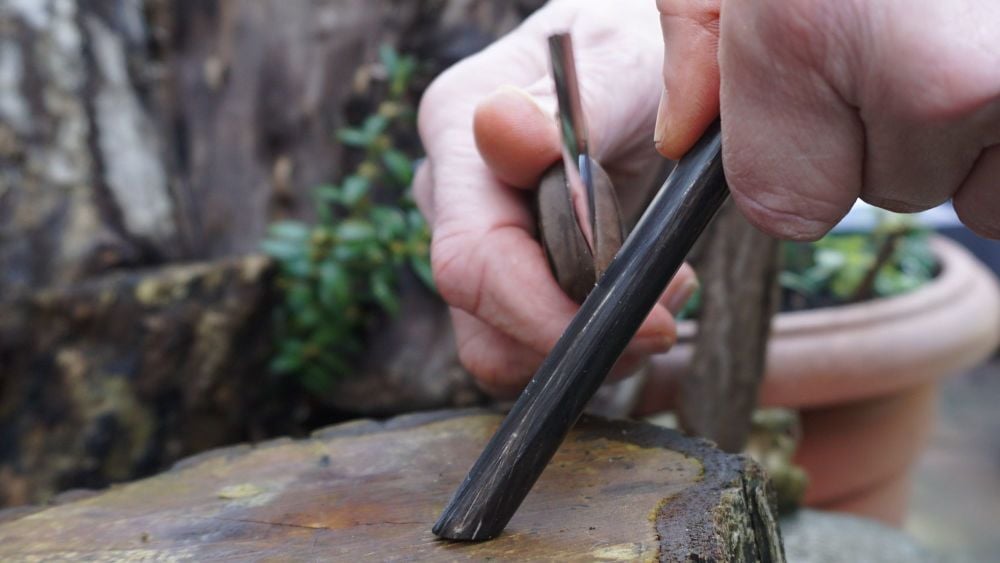 One of the very best ways that I personally use to test the sharpness of a blade, which also gives very reliable result, is to use what I call a ‘Blade Wand’!
A Blade Wand is simply a specially shaped piece of animal horn, or hard plastic, that allows you to test your blade for sharpness as well as test for micro nicks & chips that may be on the blade but too small to see with the naked eye – it is also an ideal test for children to use - and the accident prone - since it is a very safe and controllable technique.
By holding the Blade Wand downwards at an angle of about 60 to 70 degrees to the horizontal, the blade’s cutting edge can be gently rested on the long side of the wand, under its own weight. If the blade slides down the length of the wand it should be considered to be dull and in much need of a good sharpening. Conversely if the blade bites into the wand and remains where it is placed, without sliding down the length of the wand, it can be considered to be sharp. By performing this test on several parts of the blade you can quickly get an overall picture of the blades condition and sharpness. It is really that simple!
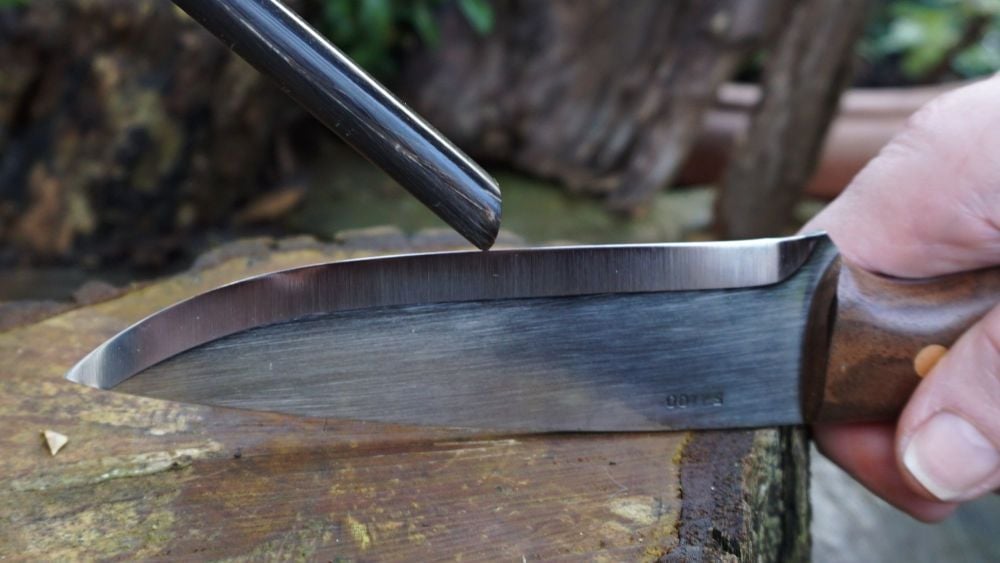 A secondary bonus to using the Blade Wand is that it can also be used to determine if the cutting edge of a blade has any micro nicks & chips in it that may be not be visible to the naked eye. This is done by gently holding the Blade Wand, at one end, between the thumb and forefinger, then placing the other end of the wand onto the blade’s cutting edge that has been turned up to face the sky. Then, by gently sliding the end of the wand along the entire length of blade any micro nicks & chips, of any size, will instantly become apparent as they will be felt through the fingers. The wand acts like an amplifier that vibrates due to the flaws and imperfections that may be present on the blade. If the cutting edge does feel rough then it will indicate that it is damaged by micro-nicks & chips and is therefore in need of some TLC. Conversely, if the cutting edge has a smooth silky feel to it, it will indicate that the cutting edge is, in fact, in good condition.
By using a Blade Wand, as described above, you will know for certain whether a cutting edge is either sharp or dull, has a clean smooth cutting edge or a chipped & nicked one.
The down side of the Blade Wand test is your reliance on having to have a Blade Wand to hand when it is needed. If one is not available to you, however, you could always try the Fingernail Trick, which is just as effective, if not a little more risky to the user, and probably not really suitable for children or the accident prone!
The Fingernail Trick
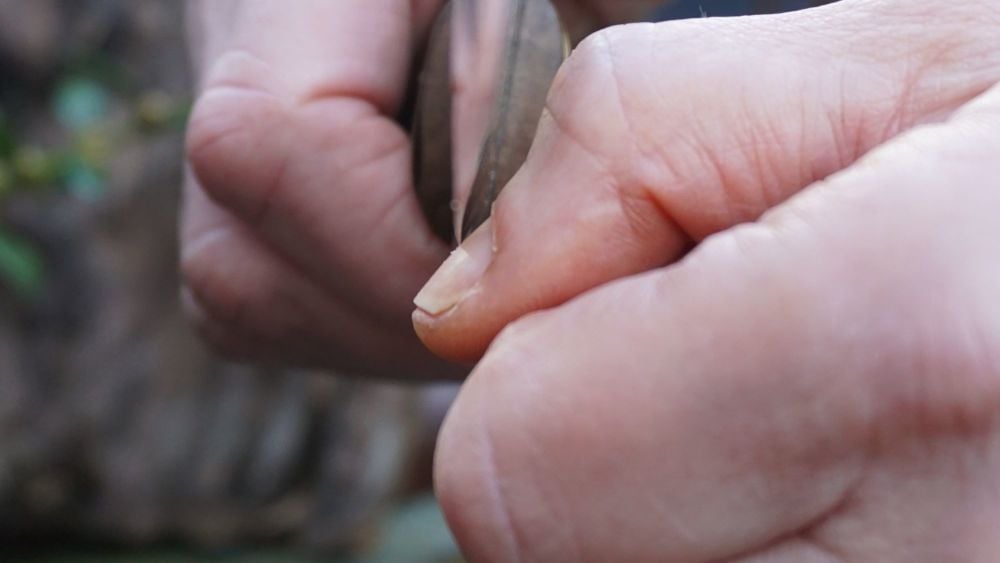 Like the Blade Wand test, the Fingernail Trick is a most reliable and accurate sharpness test. Its main advantage over the Blade Want test is that it does not require any props, such as the Blade Wand, other than the fingernails on your own hand to perform, and since most of us always keep our hands with us at all times, it is a test that can be performed anywhere at any time.
If you are able to use the Blade Wand technique you are able to use the Fingernail Trick technique since they both employ exactly the same principles.
To test the sharpness of a blade using the Fingernail Trick you will need to point your fingers at about a 45 degree angle to the ground with your thumb pointing to the sky. Then by closing the fingers to form a fist and then resting your thumb on the second knuckle of your forefinger you are ready to perform the sharpness test. The thumb should, at this point be pointing downwards at about a 60 to 70 degree angle.
Again, as in the Blade Wand technique, you should rest the blade’s cutting edge, under its own weight, on the thumb nail. If the blade slides down the nail is in need of a good sharpening, conversely if the blade bites into the nail and remain where you placed it, is sharp.
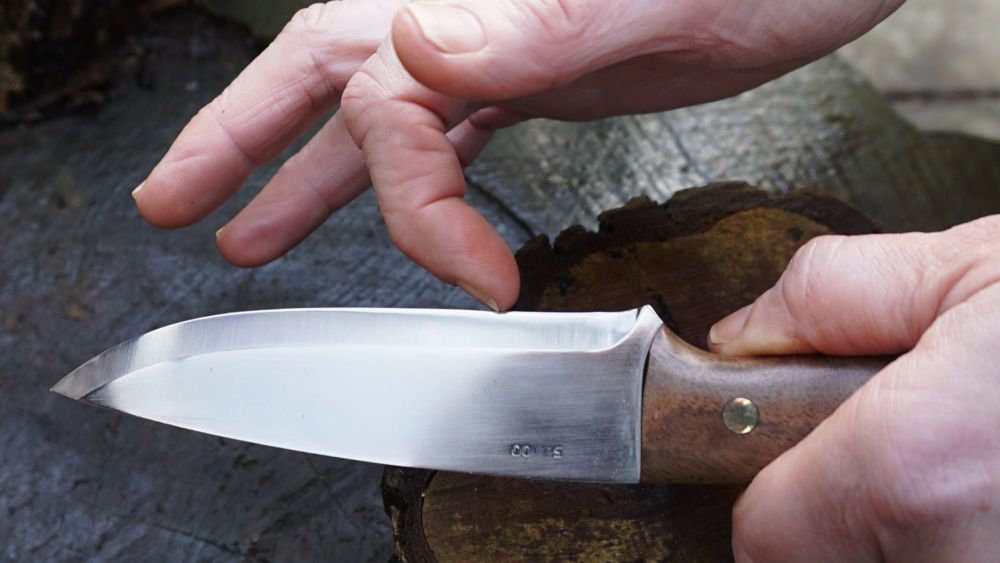 To test the blade’s cutting edge for nicks & chips, that may not be visible to the naked eye, you can use any of your fingers as an amplifier … as long as that finger has a nail that extends beyond the end of your finger that is … by simply extending the finger (I like to use my right forefinger, since I am right handed and have more control over it than any other finger) and placing the point of the nail onto the cutting edge and then gently sliding it along the blade’s length whilst keeping the finger relaxed as you do so. If the blade has a smooth silky feel to it, then you have a good clean cutting edge; by contrast, if you can feel your finger vibrating or the blade’s cutting edge feels rough, you can be sure that there are flaws, nicks and chips on the cutting edge that will need to be removed.
The down side of this test, as I have already mentioned, is that you will need to have finger nails that extend beyond the length of your finger if you are to avoid being cut.
The Three Finger Test
The Three Finger Test requires that you have a little trust in yourself that you won’t get cut whilst attempting this technique, as well as a good steady hand. If you don’t and don’t then this test is probably not for you.
Whilst you may, initially, think, upon reading about how the Three Fingered Test is practiced, that is remarkably similar to the good old Thumb Test, as mentioned above; let me assure you that they are, in fact, a world apart from each other; one works and the other does not.
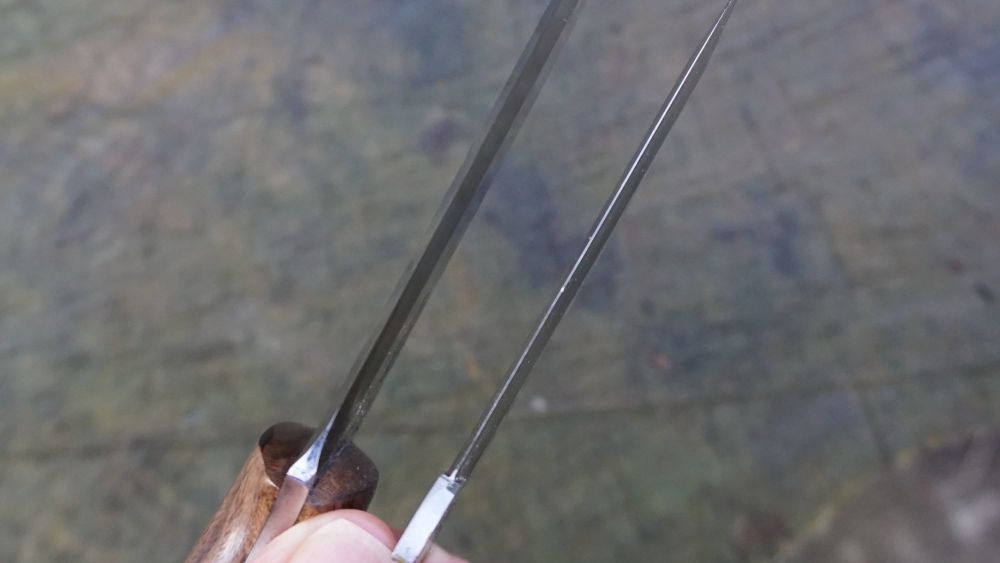 You perform the Three Fingered Test by first looking along the length of the blade, preferably in a good strong light, to check for any signs of a shiny white line that may be sitting right where the cutting edge should be.
Now ideally you should not see a shiny long line, or any part of a shiny line, that runs along the blade’s actual cutting edge, if you do, then the blade will need to be sharpened so that it, or they, can be removed.
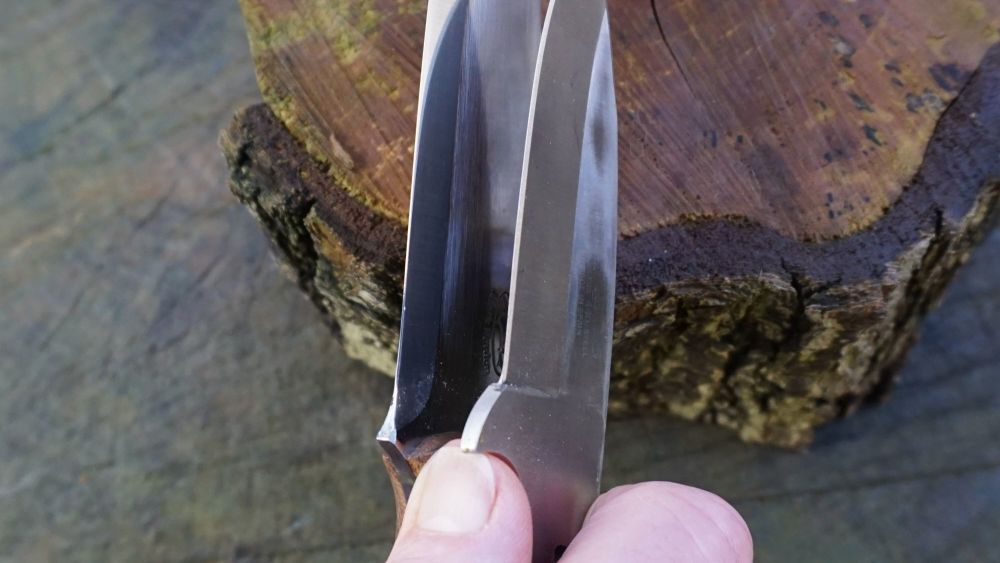 It is important that you not confused this line with the any shiny lines that make up the ‘V’ shape which converge to create the cutting edge. The ‘V’ lines either side of the actual cutting edge may be seen if the blade is angled a little from side to side and should be there; if they are seen they will clearly sit on either side of the blade’s actual cutting edge.
Once you have established that there is no shiny white line running along any part of the blades actual edge that should not be there (as in the ‘V’) you can proceed with the Three Fingered Test by placing your thumb on the spine of the knife - the thumb acts a sort of anchor giving you a great deal control and stability to your hand and fingers when progressing to the actual test itself.
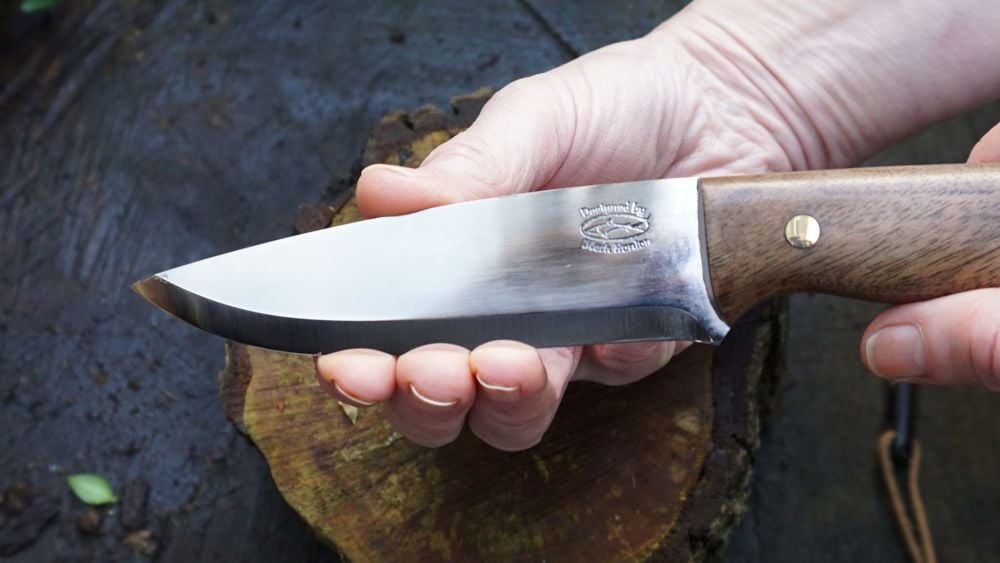 Place your forefinger, middle finger and ring finger together. Then very slowly and very carefully move all three fingers, as one, towards the blade’s cutting edge, with the aim of eventually making very light contact - this is when you will need a good steady hand. Since the thumb, being on the spine of the blade, offers you a great deal of control as you move the three fingers towards the cutting edge, there is very little to no chance of you actually cutting yourself whilst performing this act. By using the three fingers together, you increase the number of nerve receptors that are in contact with the blade’s cutting edge by a factor of three, whilst at the same time decreasing the overall pressure applied to your fingers by the blade’s cutting edge by the same factor.
Now, at this point that you will need to grow a huge pair of cahoonas and trust that you will not cut yourself. This is because you should, very gently, see if you can slide your fingers from side to side, but ONLY by only a millimetre or so, along the blade’s cutting edge. There will be a number of outcomes to this action: -
- If your blade is Scary Sharp, the old brain claxon sounding, your brain will be screeching out at full volume “DO NOT MOVE YOUR FINGER!!!” If this is the case then your blade has scared the bejesus out of you and might be so darn sharp that is known as Scary Sharp.
- If your blade is razor sharp you will see that the skin on your fingertips will remain quite still whilst the rest of the fingers move slightly from side to side. You should also feel that the cutting edge is quite smooth upon initial contact. If the cutting edge is razor sharp it will be very slightly biting into epidermis layer of the skin and thus preventing the skin from sliding. You will get a strong feeling of danger and impression that if you attempt to move your fingers further, or apply more pressure, you will most definitely receive a cut from the blade. Strangely enough, the sharper the cutting edge the stronger this feeling will present itself to you, hence the idea that a blade can be ‘Scary Sharp’.
- If you feel that the cutting edge is sharp, but not sharp enough to cut you if you can slide your fingers a millimetre or so , then you can gently extend the movement, and therefore the boundaries of the cutting edge’s sharpness with more and more movement, until the blade starts to bite into the epidermis layer of the fingers. This will enable you to make confident judgement call as well as offer up an opinion as to how sharp you think the blade actually is.
- If you can apply more pressure to the blade without danger of being cut by it, and see that your fingertips turn white as the blood is pressed out of the capillaries due to the increased pressure you are applying, it is a good indicator that you do not have a good sharp cutting edge and it is therefore in need of sharpening. Testing the edge further, by being able to apply more pressure and at the same time seeing that you can slide your fingers along the blade cutting without it cutting into the epidermis layer, is the clincher that will allow you to draw the conclusion that the blade is most probably dull.
- If the blade is obviously dull or has a burr/wire cutting edge, you will most likely detect this whilst looking along the cutting edge before you even need to feel the blade with your fingers. If you then do the rest of the test your fingers will detect the faux cutting edge, although you may not be able to slide the fingers from side to side without being cut. If this is the case then you can confirm that it is a bur, or thin wire that constitutes the cutting edge as you will feel that you can exert greater pressure on the blade with no ill effects, the cutting edge will also feel a lot coarser.
- If you can slide your fingers along the blade’s cutting edge and it feels silky and smooth it may indicate that the blade is either very dull or it is still razor sharp, but that the cutting edge has become slightly rounded on a microscopic level – much like a ball point pen; this is indicative of a blade that has been stropped on a Honing Strop for example. Attempting to cut a piece of wood, paper or the hairs on your arm will instantly resolve the question of the blade’s sharpness.
- Lastly, if you see blood beginning to ooze from your fingertips, you can pretty much conclude that you were either not paying attention to the nerves in your fingers screaming at your brain that further movement was a bad idea, and decided to slide your fingers along the blade’s cutting edge come what may, or you are a tad the worse for wear on the alcohol front and should, therefore, not be playing with knives at this point in time! Any way you look at it you can consider the knife to be sharp!
The down side of this technique is that it does require some practice and a degree of skill to make an accurate judgement call as to the sharpness and condition of a blade’s cutting edge, as well as a big pair of nuts and the steadiness of hand required by a brain surgeon to want to try it.
The constraints of this article are far too limiting to include every technique that is available to test the sharpness of a blade, as well as go into greater detail about each technique that we have looked at, but I hope that it has introduced you to the fascinating world of cutting edge blade Sharpness Testing and has given you some ideas to play with. As a last piece of advice I would strongly advise you to keep a big box of plaster at your side to treat the inevitable cuts that you will receive when testing your blades for sharpness.
Disclaimer
Whilst the information given in this article professes to be factual, and the techniques presented have, or are, commonly employed techniques used as a means of testing the sharpness of a cutting edge, the author does not accept any responsibility in any way, shape or form for the use, or misuse, by any person(s) that decide to try these techniques out for themselves. The author does not recommend that any of these techniques be used without proper professional training and adequate professional supervision.
